Windows8.1画热度图 - 坑
想要的效果
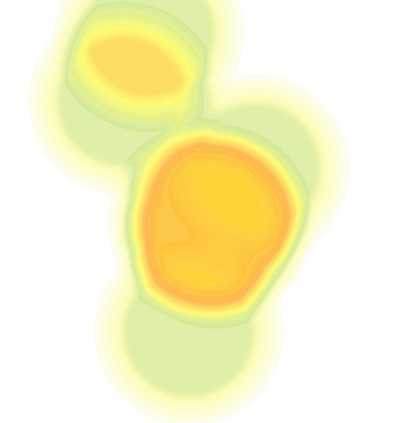
如上是silverlight版本。原理是设定一个调色板,为256的渐变色(存在一个png文件中,宽度为256,高度为1),然后针对要处理的距离矩阵图形,取图片中每个像素的Alpha值作为索引,对应到调色板的颜色。每个像素处理之后,则形成上面的热度图。该图主要表达了一个数据分布的密度。
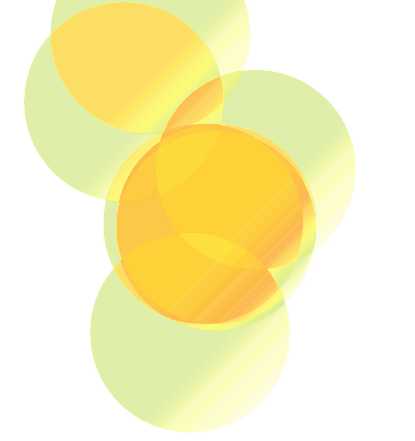
网络上有一个Gildor.HeatmapDemos工程,我主要参考了SL版本。要注意elipseRadius,如果过小,即每个圆彼此不相交,则看不到热度效果,所以代码设置初始值为100。(上图的数值初始化部分,对应代码如下)


private List<Point> plist = new List<Point>();
        private void drawHeatMap ()
        {
            plist.Clear();
            plist.Add(new Point(0.15*map.ActualWidth, 0.49*map.ActualHeight));
            plist.Add(new Point(0.20 * map.ActualWidth, 0.25 * map.ActualHeight));
            plist.Add(new Point(0.10 * map.ActualWidth, 0.15 * map.ActualHeight));
            plist.Add(new Point(0.12 * map.ActualWidth, 0.05 * map.ActualHeight));
            plist.Add(new Point(0.17 * map.ActualWidth, 0.34 * map.ActualHeight));
            plist.Add(new Point(0.17 * map.ActualWidth, 0.33 * map.ActualHeight));
            plist.Add(new Point(0.16 * map.ActualWidth, 0.33 * map.ActualHeight));

            heatMap.Source = _heatMapGen.GenerateHeatMap (
                plist,
                new Size (map.ActualWidth, map.ActualHeight));
        }
我需要在windows 8.1的RT版本中实现类似功能。
1、读取调色板文件
            Uri uri = new Uri("ms-appx:///assets/bookpage/Palette.bmp");
            RandomAccessStreamReference streamRef = RandomAccessStreamReference.CreateFromUri(uri);


            using (IRandomAccessStreamWithContentType fileStream = await streamRef.OpenReadAsync())
            {
                BitmapDecoder decoder = await BitmapDecoder.CreateAsync(fileStream);
                BitmapFrame frame = await decoder.GetFrameAsync(0);

                PixelDataProvider pixelProvider = await frame.GetPixelDataAsync();
                this.palette = pixelProvider.DetachPixelData();
            }
2、把UIElement转换为图形
Windows 8.1之前,没有RenderTargetBitmap类。最开始我采用了codeplex上的WriteableBitmapExtensions类,后来发现8.1中已经增加了这个类。
            RenderTargetBitmap renderTargetBitmap = new RenderTargetBitmap();
            await renderTargetBitmap.RenderAsync(canvasSpitList);//, (int)pdfBorder.Width, (int)pdfBorder.Height);
第二行就会把UIElement及所有子element写入到bitmap中。
关于RenderTargetBitmap有无数坑,msdn如下:
There are a few scenarios for XAML-composed visual content that you can‘t capture to a RenderTargetBitmap:
- Video content in a MediaElement or CaptureElement can‘t be captured using RenderTargetBitmap. That includes capturing frames from within video content.
- Custom DirectX content (your own swap chain) inside a SwapChainBackgroundPanel or SwapChainPanel can‘t be captured using RenderTargetBitmap.
- Content that‘s in the tree but with its Visibility set to Collapsed won‘t be captured.
- Content that‘s not directly connected to the XAML visual tree and the content of the main window won‘t be captured. This includes Popup content, which is considered to be like a sub-window.
![]()
Note Windows Phone: The contents of a WebView control can‘t be rendered into a RenderTargetBitmap.
- Content that can‘t be captured will appear as blank in the captured image, but other content in the same visual tree can still be captured and will render (the presence of content that can‘t be captured won‘t invalidate the entire capture of that XAML composition).
- Content that‘s in the XAML visual tree but offscreen can be captured, so long as it‘s not Visibility=Collapsed or in the other restricted cases.
3、RadialGradientBrush在Windows RT 8.1中没有!只有LinearGradientBrush。MSDN说法这里
GradientBrush is the parent class for LinearGradientBrush. The Windows Runtime XAML vocabulary doesn‘t support RadialGradientBrush.
From <https://msdn.microsoft.com/en-us/library/windows/apps/windows.ui.xaml.media.gradientbrush.aspx>
我在SL中用Linear模式画的图如下:
4、读取要处理图形的每个像素
int width = renderTargetBitmap.PixelWidth;
int height = renderTargetBitmap.PixelHeight;

var buf = await renderTargetBitmap.GetPixelsAsync();


var stream = buf.AsStream();
byte[] srcPixels = new byte[stream.Length];
stream.Read(srcPixels, 0, (int)stream.Length);
舍弃R/G/B值,只保留A,然后读取对应的调色板颜色,进行替换。
var dstPixels = new byte[4 * width * height];

            for (int i = 0; i < srcPixels.Length; i += 4)
            {
                //int pixelIndex = ((srcPixels[i + 3] << 24) + (srcPixels[i + 2] << 16) + (srcPixels[i + 1] << 8) + (srcPixels[i + 0]));
                byte pixelIndex = srcPixels[i + 3];//只取Alpha通道的值

                if ((srcPixels[i + 0] == 0) && (srcPixels[i + 1] == 0) && (srcPixels[i + 2] == 0) && (srcPixels[i + 3] == 0)) continue;

                //winform中,pixelProvider.DetachPixelData,颜色顺序从低到高字节为:A,R,G,B,包括开始的palette取到的也是A,R,G,B
                //metro中,renderTargetBitmap.GetPixelsAsync,颜色顺序从低到高字节为:B,G,R,A
                dstPixels[i + 0] = this.palette[(byte)(~(4 * pixelIndex + 3))];//B<->A
                dstPixels[i + 1] = this.palette[(byte)(~(4 * pixelIndex + 2))];//G<->R
                dstPixels[i + 2] = this.palette[(byte)(~(4 * pixelIndex + 1))];//R<->G
                dstPixels[i + 3] = this.palette[(byte)(~(4 * pixelIndex + 0))];//A<->B
            }

            var bmp = new WriteableBitmap(width, height);//(container, null);
            WriteableBitmapExtensions.FromByteArray(bmp, dstPixels);
5、悲催的地方
通过上面第二部分读到的像素值,是A/R/G/B顺序,用winform读取,也是一样的结果
private void button1_Click(object sender, EventArgs e)
        {
            StringBuilder sb = new StringBuilder();


            using (Bitmap bmp = new Bitmap(@"c:\1.png"))
            {
                using (Graphics g = this.CreateGraphics())
                {
                    for (int i = 0; i < 256; i++)
                    {
                        var col = bmp.GetPixel(i, 0);
                        sb.AppendFormat("{0:X8},", col.ToArgb());

                        using (SolidBrush brush = new System.Drawing.SolidBrush(col))
                        {
                            g.FillRectangle(brush, new Rectangle(5 * i, 10, 3, 3));
                        }
                    }
                }
            }


            MessageBox.Show(sb.ToString());
        }
得到的像素顺序:
比如第一个亮黄颜色,在这里与palette部分读到都是A/R/G/B顺序,但是在上面第4部分,读到的确是B/G/R/A部分。所以第4部分中,对像素颜色进行了对调。
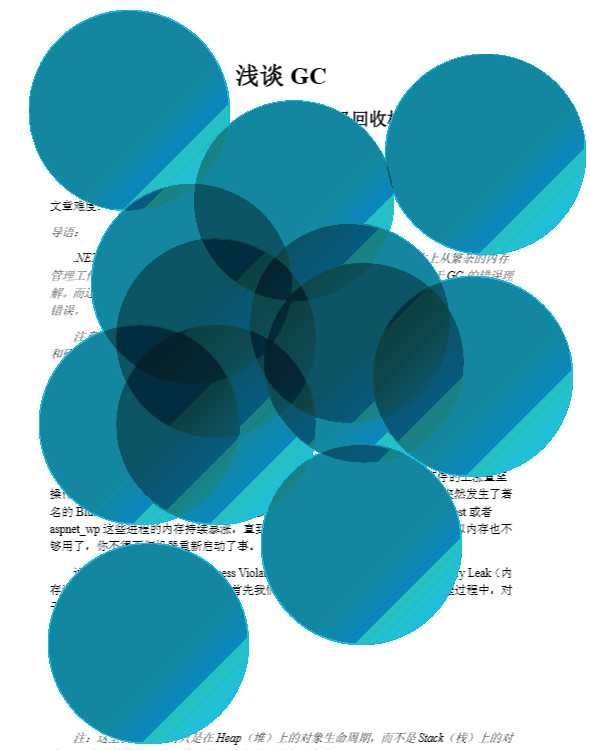
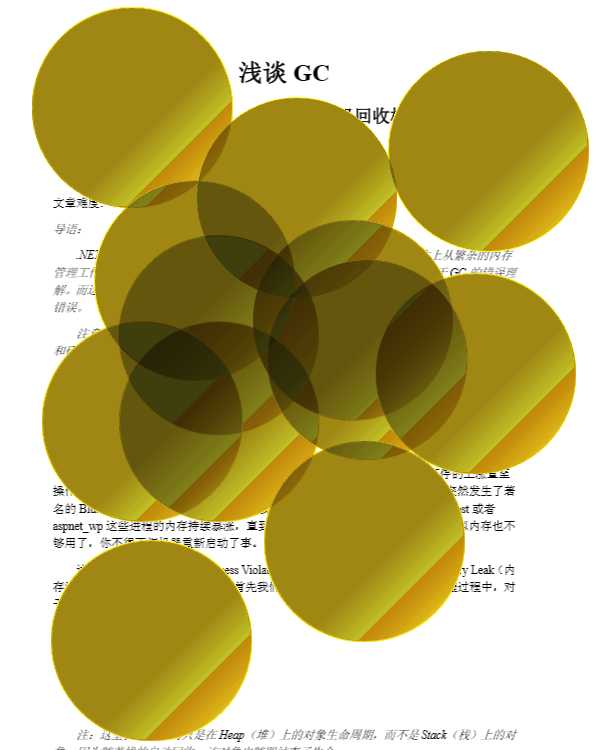
但是,得到的是这么一个悲催的图像:
颜色不对!热度效果也没有!
求指点,请帮助!
-------------------------------------------------------
6、仔细检查了一下,第2部分的palette取到的是R/G/B/A顺序,所以第4部分的调色板代码修改如下:
                //winform中,颜色顺序从低到高字节为:A,R,G,B
                //palette中,pixelProvider.DetachPixelData取到的却是R,G,B,A
                //metro中,renderTargetBitmap.GetPixelsAsync,颜色顺序从低到高字节为:B,G,R,A
                dstPixels[i + 0] = this.palette[(byte)((4 * pixelIndex + 2))];//B<->A
                dstPixels[i + 1] = this.palette[(byte)((4 * pixelIndex + 1))];//G<->R
                dstPixels[i + 2] = this.palette[(byte)((4 * pixelIndex + 0))];//R<->G
                dstPixels[i + 3] = this.palette[(byte)((4 * pixelIndex + 3))];//A<->B
但是热度效果依然不对,难道是因为LinearGradientBrush缘故?
原文:http://www.cnblogs.com/juqiang/p/4245155.html