WPF 入门 (二) MVVM 入门
此入门教程是记录下方参考资料视频的学习过程
开发工具:Visual Studio 2019
目录
基本常识
开发/学习环境的准备
- Visual Studio
- Microsoft Prism:这个框架包含了对 MVVM 开发模式的支持。现在 NuGet 里有
- Microsoft Blend SDK:不是必须,能解决 MVVM 力不从心的问题。现在 NuGet 里也有
必要知识的准备
- 熟悉 Data Binding 和 Dependency Property
- 了解 WPF 中的命令(知道 ICommand 接口即可)
- 熟悉 Lambda 表达式
创建 Code Snippet (代码模板)
- Code Snippet 的使用
- for
- class
- prop
- ctor
- ......
- Code Snippet 的创建
- Tools --> Code Snippets Manager 找到想修改的文件,从文件管理器复制出来修改,这里复制修改 propfull 的 Snippet
对应修改代码模板,修改文件名称,保存并复制回去就可以使用了
- Tools --> Code Snippets Manager 找到想修改的文件,从文件管理器复制出来修改,这里复制修改 propfull 的 Snippet
<Title>propn</Title>
<Shortcut>propn</Shortcut>
<Description>Code Snippet for NotificationObject property and backing field</Description>
        <Code Language="csharp"><![CDATA[private $type$ $field$;

public $type$ $property$
{
    get { return $field$;}
    set
    {
        $field$ = value;
        this.RaisePropertyChanged("$property$");
    }
}
$end$]]>
        </Code>
这个代码模板就绑定到 propn 上了
this.RaisePropertyChanged("$property$"); 功能通知属性改变,这个类以后再写,"$property$"可以使用 nameof($property$) 更不容易错
MVVM 设计模式详解
MVVM = Model - View - ViewModel
为什么要使用 MVVM 模式
- 团队层面:统一思维方式和实现方法
- 架构层面:稳定、解耦、富有禅意
- 代码层面:可读、可测、可替换
解耦是指 UI 与业务逻辑分离
什么是 Model
- 现实世界中对象的抽象结果,比如 学生 --> Student 之类的
什么是 View 和 ViewModel
- View = UI
- ViewModel = Model for View
- View 需要显示什么,ViewModel 就要准备什么
- View 能做什么操作,ViewModel 就要能够响应这个操作
- ViewModel 与 View 的沟通
- 传递数据依靠数据属性
- 传递操作依靠命令属性
程序的 UI 由 Model 驱动,用户的数据和操作给 Model
View(User Interface) <-->(双向的数据属性) View Model(Model for View)
View(User Interface) -->(单向的命令属性) View Model(Model for View)
View Model(Model for View) <--> Services <--> Database
View Model(Model for View) <--> Models <--> Services <--> Database
案例讲解
初级案例
- NotificationObject 与 数据属性
- DelegateCommand 与 命令属性
- View 与 ViewModel 的交互(技术难点)
业务逻辑:
- 两个输入数据
- 一个按钮做加法操作
- 一个显示两个输入相加的结果
- 一个保存文件操作
新建项目
新建 WPF 项目,项目名称 SimpleMvvmDemo.Client
先新建文件夹
- Views
- ViewModels
- Models
- Services
- Commands
双向的数据属性 Binding
NotificationObject 用来做数据传输
ViewModels 目录下新建一个 ViewModel 的基类,命名 NotificationObjector ,具有通知能力的基类
当 ViewModel 里某个属性的值变化之后,通过某个机制通知 Binding,Binding 把数据送到 View 上
NotificationObjector 实现 INotifyPropertyChanged 接口,这个接口有一个事件 PropertyChanged
当 ViewModel 的某个属性借助 数据属性Binding 关联到 View 的某个控件上的话,当这个值变化的时候,Binding 就是在监听着 PropertyChanged 事件,一旦事件发生,就把变化后的值送到界面上去
public class NotificationObjector : INotifyPropertyChanged
{
    public event PropertyChangedEventHandler PropertyChanged;

    public void RasisePropertyChanged(string propertyName)
    {
        if (null != this.PropertyChanged)
        {
            this.PropertyChanged.Invoke(this, new PropertyChangedEventArgs(propertyName));
        }
    }
}
PropertyChangedEventHandler 委托
表示将处理 PropertyChanged 事件的方法,该事件在更改组件上的属性时引发。
单向的命令属性 Binding
DelegateCommand 用来做操作传输
Commands 目录下新建一个类,命名 DelegateCommand ,实现 ICommand 接口,里面有三个东西
- 事件
CanExecuteChanged当这个命令能不能执行的状态发生改变的时候,有机会通知命令的调用者 - 方法
CanExecute(object parameter)用来帮助命令的呼叫者判断这个命令能不能执行 - 方法
Execute(object parameter)当命令执行的时候,你想做什么,就写在这个地方
简陋的 DelegateCommand ,只用于讲解本案例
public class DelegateCommand : ICommand
{
    public event EventHandler CanExecuteChanged;

    public bool CanExecute(object parameter)
    {
        if (null == this.CanExecuteFunc)
        {
            return true;
        }
        return this.CanExecuteFunc(parameter);
    }

    public void Execute(object parameter)
    {
        if (null == this.ExecuteAction)
        {
            return;
        }
        this.ExecuteAction(parameter);
    }

    public Action<object> ExecuteAction { get; set; }
    public Func<object, bool> CanExecuteFunc { get; set; }
}
ViewModel
在 ViewModels 目录新建 MainWindowViewModel ,继承刚才的 NotificationObject 类,这里面的代码会用到上面写的 propn 代码模板
实现三个数据属性和两个命令操作
public class MainWindowViewModel : NotificationObjector
{
    #region 关联属性
    private double _input_01;

    public double Input_01
    {
        get { return _input_01; }
        set
        {
            _input_01 = value;
            this.RaisePropertyChanged(nameof(Input_01));
        }
    }

    private double _input_02;

    public double Input_02
    {
        get { return _input_02; }
        set
        {
            _input_02 = value;
            this.RaisePropertyChanged(nameof(Input_02));
        }
    }


    private double _result;

    public double Result
    {
        get { return _result; }
        set
        {
            _result = value;
            this.RaisePropertyChanged(nameof(Result));
        }
    }
    #endregion

    #region 关联操作
    public DelegateCommand AddCommand { get; set; }
    public DelegateCommand SaveCommand { get; set; }

    private void Add(object parameter)
    {
        this.Result = this.Input_01 + this.Input_02;
    }

    private void Save(object parameter)
    {
        SaveFileDialog dlg = new SaveFileDialog();
        dlg.ShowDialog();
    }

    public MainWindowViewModel()
    {
        this.AddCommand = new DelegateCommand();
        this.SaveCommand = new DelegateCommand();
        //this.AddCommand.ExecuteAction = new Action<object>(this.Add);
        //this.SaveCommand.ExecuteAction = new Action<object>(this.Save);
        this.AddCommand.ExecuteAction = this.Add;
        this.SaveCommand.ExecuteAction = this.Save;
    }

    #endregion

}
View
使用 {Binding} 绑定数据源和操作,要对应属性,没有智能提示
MainWindow.xaml
<Window x:Class="SimpleMvvmDdeml.Client.MainWindow"
        xmlns="http://schemas.microsoft.com/winfx/2006/xaml/presentation"
        xmlns:x="http://schemas.microsoft.com/winfx/2006/xaml"
        xmlns:d="http://schemas.microsoft.com/expression/blend/2008"
        xmlns:mc="http://schemas.openxmlformats.org/markup-compatibility/2006"
        xmlns:local="clr-namespace:SimpleMvvmDdeml.Client"
        mc:Ignorable="d"
        Title="MainWindow" Height="450" Width="800">
    <Grid>
        <Grid.RowDefinitions>
            <RowDefinition Height="Auto"/>
            <RowDefinition Height="*"/>
        </Grid.RowDefinitions>
        <Menu>
            <MenuItem Header="_File">
                <MenuItem Header="_Save" Command="{Binding SaveCommand}"/>
            </MenuItem>
        </Menu>
        <Grid Grid.Row="1">
            <Grid.RowDefinitions>
                <RowDefinition Height="Auto"/>
                <RowDefinition Height="Auto"/>
                <RowDefinition Height="Auto"/>
                <RowDefinition Height="*"/>
            </Grid.RowDefinitions>
            <Slider x:Name="Slider_01" Grid.Row="0" Background="LightBlue" Minimum="-100" Maximum="100" Margin="4" Value="{Binding Input_01}"/>
            <Slider x:Name="Slider_02" Grid.Row="1" Background="LightBlue" Minimum="-100" Maximum="100" Margin="4" Value="{Binding Input_02}"/>
            <Slider x:Name="Slider_03" Grid.Row="2" Background="LightBlue" Minimum="-100" Maximum="100" Margin="4" Value="{Binding Result}"/>
            <Button x:Name="Button_Add" Grid.Row="3" Content="Add" Width="120" Height="80" Command="{Binding AddCommand}"/>
        </Grid>
    </Grid>
</Window>
没有指定 Source 会拿 DataContext 当作 Source ,当 DataContext 也没有就会往上级找,最后找到 Window
所以,我们需要在构造函数中绑定 ViewModel
MainWindow.cs
public partial class MainWindow : Window
{
    public MainWindow()
    {
        InitializeComponent();

        this.DataContext = new MainWindowViewModel();
    }
}
效果
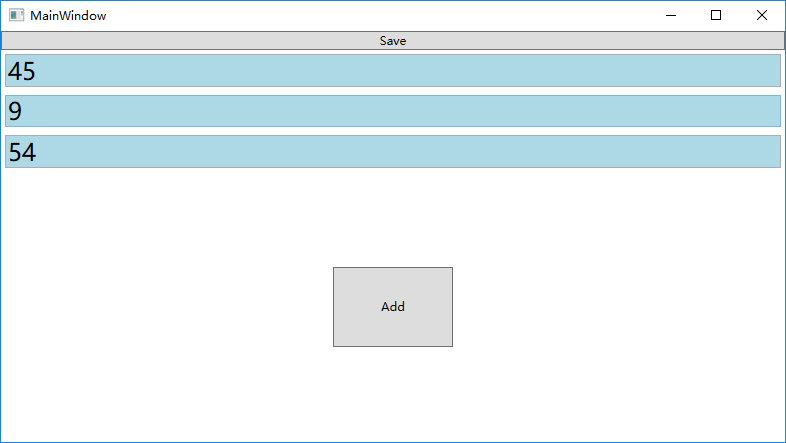
只修改前台代码,同样可以运行
<Window x:Class="SimpleMvvmDdeml.Client.MainWindow"
        xmlns="http://schemas.microsoft.com/winfx/2006/xaml/presentation"
        xmlns:x="http://schemas.microsoft.com/winfx/2006/xaml"
        xmlns:d="http://schemas.microsoft.com/expression/blend/2008"
        xmlns:mc="http://schemas.openxmlformats.org/markup-compatibility/2006"
        xmlns:local="clr-namespace:SimpleMvvmDdeml.Client"
        mc:Ignorable="d"
        Title="MainWindow" Height="450" Width="800">
    <Grid>
        <Menu>
            <MenuItem Header="_File">
                <MenuItem Header="_Save" Command="{Binding SaveCommand}"/>
            </MenuItem>
        </Menu>
        <Grid Grid.Row="1">
            <Grid.RowDefinitions>
                <RowDefinition Height="Auto"/>
                <RowDefinition Height="Auto"/>
                <RowDefinition Height="Auto"/>
                <RowDefinition Height="*"/>
            </Grid.RowDefinitions>
            <Slider x:Name="Slider_01" Grid.Row="0" Background="LightBlue" Minimum="-100" Maximum="100" Margin="4" Value="{Binding Input_01}"/>
            <Slider x:Name="Slider_02" Grid.Row="1" Background="LightBlue" Minimum="-100" Maximum="100" Margin="4" Value="{Binding Input_02}"/>
            <Slider x:Name="Slider_03" Grid.Row="2" Background="LightBlue" Minimum="-100" Maximum="100" Margin="4" Value="{Binding Result}"/>
            <Button x:Name="Button_Add" Grid.Row="3" Content="Add" Width="120" Height="80" Command="{Binding AddCommand}"/>
        </Grid>
    </Grid>
</Window>
效果
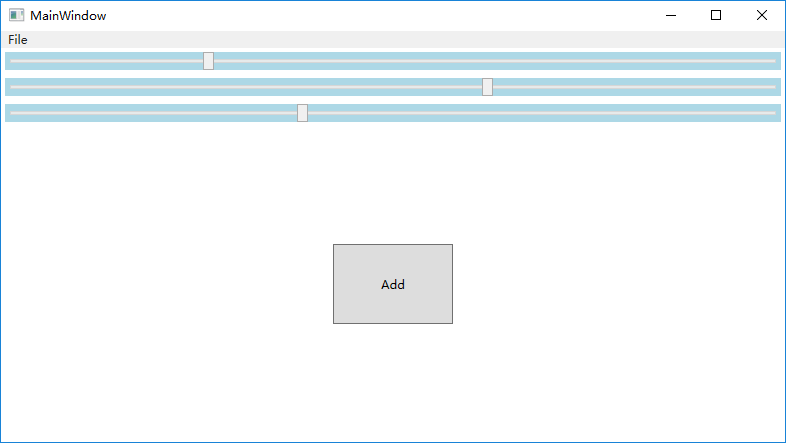
同样的业务逻辑,只是界面不同,所以只需要修改 View ,ViewModel 和 Model 不需要改变
WPF 入门 (二) MVVM 入门 结束
原文:https://www.cnblogs.com/zzy-tongzhi-cnblog/p/14805939.html