VSCode 搭建 Arm 远程调试环境
时间:2020-04-01 18:18:15
收藏:0
阅读:328
简介
前提条件:
- 确保本机已经安装 VS Code。
- 确保本机已安装 SSH client, 并且确保远程主机已安装 SSH server。
- VSCode 已经安装了插件 C/C++。
本次搭建的环境:
- 主机:windows 10
- 服务器:ubuntu 16.04
- VSCode 版本:February 2020 (version 1.43)
- Arm:海思 3559A (已配置好编译工具链和 gdb server)
连接远程主机
Remote Development
首先安装 Remote Development 插件,安装完成之后:
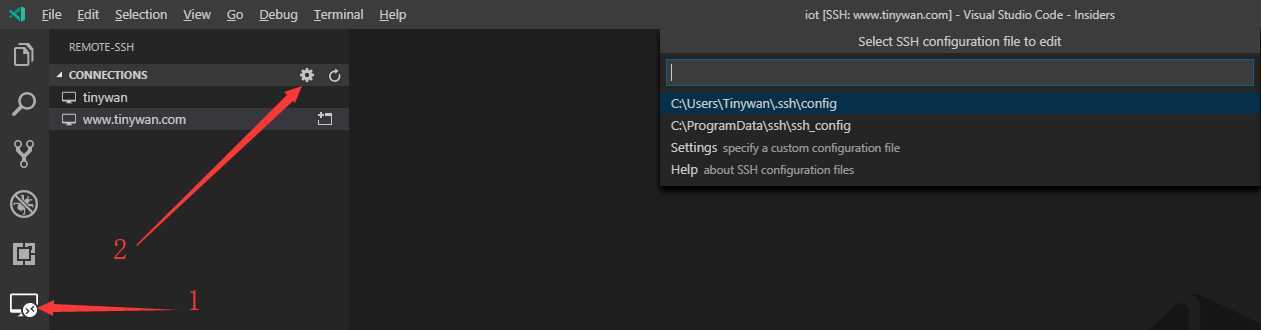
如上图所示,输入:Remote-SSH:Connect to Host->Configure SSH Hosts->选择一个config,配置信息:
# Read more about SSH config files: https://linux.die.net/man/5/ssh_config
Host Server
    HostName 10.10.1.111
    User name
其中:
- Host: 远程主机名称。
- HostName: 远程主机 IP。
- User: 连接用户名。
输入完毕后保存,左侧会出现配置好的信息,右键登陆,可能需要密码:

插件安装
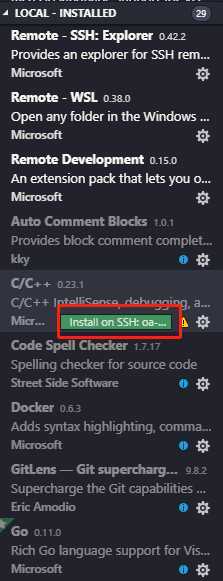
连接到 server 后会发现,安装的插件分为两栏,可以在远程服务器安装需要的插件:
远程主机命令行
Ctrl + ~ 打开终端窗口,VS Code 连接到远程主机后,就可以直接使用终端窗口在远程主机上执行终端命令。
arm 远程调试
VSCode 配置
配置 gdb 的配置文件 launch.json:
{
    // Use IntelliSense to learn about possible attributes.
    // Hover to view descriptions of existing attributes.
    // For more information, visit: https://go.microsoft.com/fwlink/?linkid=830387
    "version": "0.2.0",
    "configurations": [

        {
            "type": "cppdbg",
            "request": "launch",
            "name": "Debug for test",
            "skipFiles": [
                "<node_internals>/**"
            ],
            "args": [],
            "program": "${workspaceFolder}/build/bin/test.debug",
            "stopAtEntry": false,
            "cwd": "${workspaceFolder}",
            "externalConsole": true,
            "MIMode": "gdb",
            "setupCommands": [
                {
                    "description": "Enable pretty-printing for gdb",
                    "text": "-enable-pretty-printing",
                    "ignoreFailures": true
                }
            ],
            "miDebuggerPath":"/opt/hisi-linux/x86-arm/aarch64-himix100-linux/bin/aarch64-himix100-linux-gdb",
            "miDebuggerServerAddress": "192.168.172.110:1234"
        }
    ]
}
- type:调试的类型
- name:配置文件的名字
- request:配置文件的请求类型,有 launch 和 attach 两种,具体看官方文档
- program:可执行文件的路径和文件名称
- args:主函数调用时传入的参数
- stopAtEntry:设为true时程序将暂停在程序入口处
- cwd:调试时的工作目录
- externalConsole:调试时是否显示控制台窗口
- MIMode:指定 VS Code 连接的调试器,必须为 gdb 或者 lldb
- miDebuggerPath:调试器路径
- miDebuggerServerAddress: 板子 ip
arm 上运行 gdb server
./gdbserver :1234 test.debug
开始调试
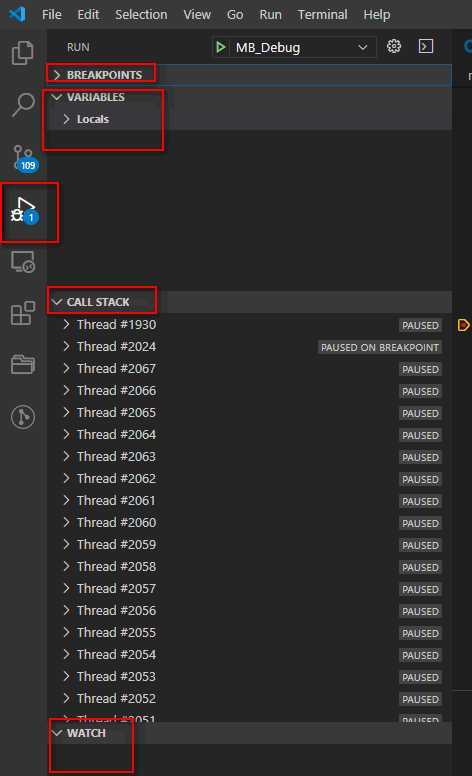
VSCode 按 F5 开始调试:

断点设置,变量、栈查看:
原文:https://www.cnblogs.com/xiaojianliu/p/12614408.html
评论(0)