一文深入了解史上最强的Java堆内缓存框架Caffeine
它提供了一个近乎最佳的命中率。从性能上秒杀其他一堆进程内缓存框架,Spring5更是为了它放弃了使用多年的GuavaCache
缓存,在我们的日常开发中用的非常多,是我们应对各种性能问题支持高并发的一大利器。我们熟知的缓存有堆缓存(Ehcache3.x、Guava Cache等)、堆外缓存(Ehcache3.x、MapDB等)、分布式缓存(Redis、 memcached等)等等。今天要上场的主角是Caffeine,它其实是Google基于Java8对GuavaCache的重写升级版本,支持丰富的缓存过期策略,尤其是TinyLfu 淘汰算法,提供了一个近乎最佳的命中率。从性能上(读、写、读/写)也足以秒杀其他一堆进程内缓存框架。Spring5更是直接放弃了使用了多年的Guava,而采用了Caffeine。
 (以上数据来自官方读写性能测试结果,更多测试结果详见 https://github.com/ben-manes/caffeine/wiki/Benchmarks)
当然在实际使用中基本会涉及中多个缓存的组合使用,比如二级缓存(Caffeine+Redis)、多级缓存等等,这个以后再讲。接下来我们分【基础实战】、【高阶用法】、【理论概述】三个部分来聊一聊史上最强的Java堆内缓存框架。
(在“码大叔”公众号回复数字136即可获取演示源码及牛逼的TinyLfu论文。论文版权归原作者所有,向大神学习致敬)
====基础实战====
接下来我们通过一些例子来演示Caffeine的基础用法,首先我们通springboot新建一个mds-caffeine-demo的Gradle工程。
一、基础配置
1、添加依赖
需要使用到 spring-boot-starter-cache和caffeine两个包
implementation 'org.springframework.boot:spring-boot-starter-cache'
implementation 'com.github.ben-manes.caffeine:caffeine'
2、在applicationyml文件中添加配置
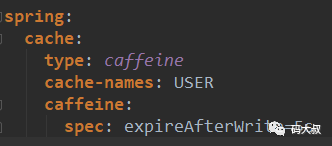
spring:
   cache:
       type: caffeine
3、添加注解
在启动类上添加@EnableCaching

就是这么地 so easy,Caffeine就已经集成到我们的项目中来了。
二、实战演示
假设我们数据库中有一张User表,里面有【码大叔和小九九】2条数据
|id| name |birdhtday|
|--|--|--|
|1 | 码大叔 |2012-05-12|
|2 | 小九九 |1999-09-19|
场景1:添加及使用缓存
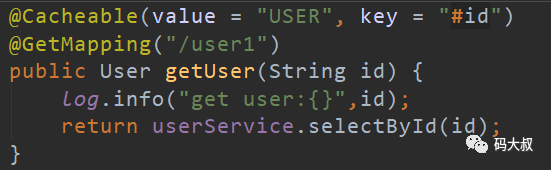
只需要使用@Cacheable注解即可自动将数据添加到缓存中,后续直接从缓存中读取数据。
value:表示缓存的名称,这个参数value还是比较误导人的,不是缓存的值,所以官方还提供了一种写法:cacheNames。
key:表示缓存的key,可以为空。如果指定需要按照SpEL表达式编写
方法1、将用户对象以ID作为key存放到缓存中。
我们访问页面:

第一次:打印了数据库操作的日志
 第二次:没有打印,表示缓存添加成功。
方法2、将满足条件的数据存放到缓存中
@Cacheable有一个参数叫做condition,该条件为true时则放到缓存到。该参数同样需使用SpEL表达式。

接下来我们分别进行用户1、用户2、用户1、用户2 四次查询。我们看到只打印了3条数据,第二次访问用户1从缓存中读取数据,用户2每次都是从数据库中读取数据,没进入缓存。

【敲黑板】
- 还有一个条件参数unless,与condition的用法恰好相反。
- 使用了条件式缓存后,哪怕哪怕缓存里已经有数据了,也依然会跳过缓存。比如我们在其他方法中将“小九九”添加到了缓存中,但通过该方法获取小九九的数据时,依然是从数据库中取值。
- @Cacheable注解不仅仅可以标记在一个方法上,还可以标记在一个类上,表示该类所有的方法都是支持缓存的。
我们除了使用参数作为key之外,Spring还为我们提供了一个root对象可以用来生成key,比如 #root.methodName(当前方法名), #root.target(当前被调用的对象), #root.args[0]( #root.args[0])等等。
场景2:更新缓存
使用@CachePut,添加了该注解后每次都会触发真实方法的调用

我们觉得码大叔的年龄可能造假了,怎么可能是2012年,把它更新为真实的年龄。

我们看到数据库层面打印了日志。

此时我们再访问获取用户信息方法,已经获取到了最新的数据,但服务端却没有任何日志。

这表明该注解已帮我们把最新的信息更新到了缓存中。【敲黑板】
在方法上使用了@CachePut注解如果方法返回了void或者null,也会同步更新缓存,缓存的对象为空,所以使用时务必要注意。缓存默认是支持存储nul的,这也符合我们使用缓存的诉求。如果在某些特殊的场景下不希望缓存null对象,可以使用condition条件:condition = "#result != null" 即可。
场景3:删除缓存
使用@CacheEvict注解,可以手动将对象从缓存中删除。

比如上面的方法,表示将指定id的用户从缓存中删除。如果期望将USER的所有缓存删除,则可以使用参数 allEntries = true(默认为false) 即可。
【敲黑板】如果方法里有代码逻辑,那么是先删除缓存还是先执行方法呢?答案是先执行方法,后清除缓存。如果期望先清除缓存后执行方法,则添加参数 beforeInvocation = true即可。
==高阶用法==
1:线程锁定
前面我们提到了@Cacheable可以添加缓存,当缓存过期之后如果多个线程同时请求过来,而该方法执行较慢时可能会导致大量请求堆积,甚至导致缓存瞬间被击穿,所有请求同时去到数据库,数据库瞬间负荷增高。所以该注解还提供了一个参数 sync:默认为false,如果为true时表示多个线程同时调用此时只有一个线程能够成功调用,其他线程直接取这次调用的返回值。不过它在代码注释上也写了,这仅仅是个hint,具体还是要看缓存提供者。

不管sync设置是true还是false,Caffeine默认使用的都是单线程 :只允许一个线程去加载数据,其余线程阻塞。这样其实也会导致效率低下,用户等待。因此建议配合refreshAfterWrite一起使用:只阻塞加载数据的线程,其余线程返回旧数据。2:缓存失效
初始化缓存时,我们还可以设置3个参数:expireAfterAccess、expireAfterWrite、refreshAfterWrite。千万不要被这三个单词的表面意思误导,网上很多写法也是错的。比如expireAfterAccess,不是表示访问完多长时间就过期,而是多长时间没有访问就失效。
- expireAfterAccess=[duration]:指在指定时间内没有被读或写就回收
- expireAfterWrite=[duration]: 指在指定时间内没有被创建或覆盖就回收
refreshAfterWrite=[duration]:指在指定时间内没有被创建/覆盖,则指定时间过后再次访问时会去刷新该缓存,在新值没有到来之前,始终返回旧值
我们以expireAfterWrite为例,配置如下,然后不停地访问,我们看到每隔5秒后就自动更新一次缓存。

【敲黑板】
- 如果是yml文件要注意写法,这几个都是spec的value值,caffeine会自行解析,不要像下面这种写法,是错误的。
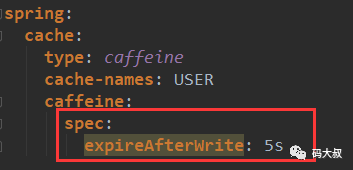
- 以expireAfterWrite为例,假设设置的是5秒,并不是指5秒后自动更新,而是在5秒后的下一次访问时才更新
如果expireAfterWrite和expireAfterAccess同时存在,以expireAfterWrite为准。
3:refreshAfterWrite
这个参数在前面也提到了在日常使用中用的比较多,尤其是对于互联网高并发的场景,所以额外再补充讲几点。
1、使用了refreshAfterWrite后,启动项目会报如下的错误,
2020-03-08 13:51:51,144|o.s.boot.SpringApplication|reportFailure|Application run failed
org.springframework.beans.factory.BeanCreationException: Error creating bean with name 'cacheManager' defined in class path resource [org/springframework/boot/autoconfigure/cache/CaffeineCacheConfiguration.class]: Bean instantiation via factory method failed; nested exception is org.springframework.beans.BeanInstantiationException: Failed to instantiate [org.springframework.cache.caffeine.CaffeineCacheManager]: Factory method 'cacheManager' threw exception; nested exception is java.lang.IllegalStateException: refreshAfterWrite requires a LoadingCache
   at org.springframework.beans.factory.support.ConstructorResolver.instantiate(ConstructorResolver.java:656)
   at com.qiaojs.mds.MDSApplication.main(MDSApplication.java:16)
Caused by: org.springframework.beans.BeanInstantiationException: Failed to instantiate [org.springframework.cache.caffeine.CaffeineCacheManager]: Factory method 'cacheManager' threw exception; nested exception is java.lang.IllegalStateException: refreshAfterWrite requires a LoadingCache
   ... 19 common frames omitted
Caused by: java.lang.IllegalStateException: refreshAfterWrite requires a LoadingCache
   ... 20 common frames omitted
这需要我们去实现一个CacheLoader,再重启就OK了。
@Bean
public CacheLoader<Object, Object> cacheLoader() {
CacheLoader<Object, Object> cacheLoader = new CacheLoader<Object, Object>() {
  @Override
  public Object load(Object key) throws Exception {
    log.info("load key:{}", key);
    return null;
  }
  @Override
  public Object reload(Object key, Object oldValue) throws Exception {
    log.info("reload key:{},oldValue:{}", key, oldValue);
    return oldValue;
  }
};
return cacheLoader;
}
2、前面也提到了Caffeine在缓存过期时默认只有一个线程去加载数据,配置了refreshAfterWrite后当大量请求过来时,可以确保其他用户快速获取响应。但refreshAfterWrite本身默认刷新也是同步的,也就意味着该调用者的线程还会处于等待状态,如有对于响应要求比较高时,可以改写reaload方法让它也异步去执行。
// 1、定义一个线程
private static ListeningExecutorService service = MoreExecutors.listeningDecorator(Executors.newFixedThreadPool(10));
//2、异步加载
 private static LoadingCache<String, String> cache = CacheBuilder.newBuilder().refreshAfterWrite(1, TimeUnit.SECONDS)
           .build(new CacheLoader<String, String>() {
               ……
               @Override
               public ListenableFuture<String> reload(String key, String oldValue) throws Exception {
                    log.info("......后台线程池异步刷新:" + key);
                   return service.submit(callable);
               }
这样就非常地完美了。
4:公共配置
如果一个类里有很多的缓存方法,可以使用@CacheConfig注解。

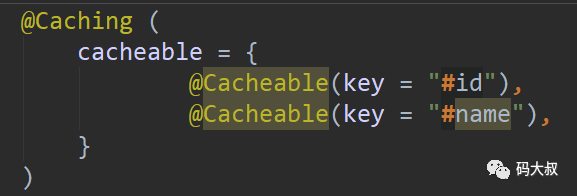
5、制定多个缓存规则
有时候我们可能需要配置多个缓存规则,以用户为例,假设用户名为唯一的,我们既要设置id为缓存的key,也要设置userName作为缓存的key,这个时候就可以用@Caching。当然,更新和删除时也都可以使用,我们先看一下它的定义:

使用举例:
6、使用Java类配置
在实际使用中,我们很少使用yml或porperties来配置缓存的一些定义,除非缓存的场景或者规则很少,一般都是使用java类来配置。这个就不做多讲,大家可以直接在码大叔公众号回复136获取演示代码。
@Bean(name = "caffeineCacheManager")
@Primary
public CacheManager caffeineCacheManager() {
  SimpleCacheManager cacheManager = new SimpleCacheManager();
  ArrayList<CaffeineCache> caches = new ArrayList<CaffeineCache>();
  //方法1:通过枚举定义
  // for (CacheDefineEnum cacheDefine : CacheDefineEnum.values()) {
  // Caffeine<Object, Object> caffeine = Caffeine.newBuilder();
  // if (-1 != cacheDefine.getTtl()) {
  // caffeine.expireAfterWrite(cacheDefine.getTtl(), cacheDefine.getTimeUnit());
  // }
  // Cache<Object, Object> cache = caffeine.maximumSize(cacheDefine.getMaxSize()).build();
  // caches.add(new CaffeineCache(cacheDefine.name(), cache));
  // }
  //方法二:通过
  caches.add(new CaffeineCache("USER",
  Caffeine.newBuilder()
    .expireAfterAccess(5, TimeUnit.SECONDS)
    .build()));
    cacheManager.setCaches(caches);
  return cacheManager;
}
7、查看缓存信息
在开发过程中,如果需要验证缓存是否生效或者我们的配置是否正确,除了看系统的运行行为,我们还可以直接去查看缓存的信息。
private CacheManager cacheManager;
@GetMapping("/cache/info")
public Object cacheData(String id) {
  Cache cache = cacheManager.getCache("USER");
  if (null == cache.get(id)) {
    return "cache is null";
  }
  Object obj = cache.get(id).get();
  if (null == obj) {
    return "null obj";
  } else {
    return "Object Info:" + obj.toString();
  }
}
8:统计监控
通过使用Caffeine.recordStats(),可以转化成一个统计的集合. 通过 Cache.stats() 返回一个CacheStats。CacheStats提供以下统计方法
- hitRate(): 返回缓存命中率
- evictionCount(): 缓存回收数量
averageLoadPenalty(): 加载新值的平均时间
9、其他配置参数
- initialCapacity=[integer]: 初始的缓存空间大小
- maximumSize=[long]: 缓存的最大条数
- maximumWeight=[long]: 缓存的最大权重
- weakKeys: 打开key的弱引用
- weakValues:打开value的弱引用
- softValues:打开value的软引用
recordStats:开发统计功能
注意:
- maximumSize和maximumWeight不可以同时使用
- weakValues和softValues不可以同时使用
====理论概述====
1、驱逐策略(Eviction)
- 基于大小
-- 基于缓存容量
-- 基于权重 - 基于时间
基于引用
2、基于引用
java有四种引用:强引用,软引用,弱引用和虚引用,caffeine可以将值封装成弱引用或软引用。- 软引用:如果一个对象只具有软引用,则内存空间足够,垃圾回收器就不会回收它;如果内存空间不足了,就会回收这些对象的内存。
弱引用:弱引用的对象拥有更短暂的生命周期。在垃圾回收器线程扫描它所管辖的内存区域的过程中,一旦发现了只具有弱引用的对象,不管当前内存空间足够与否,都会回收它的内存
3、淘汰算法
这一块就不做多讲了,大家可以直接下载关于TinyLFU的论文。
理论部分就不做多讲了,网上文章很多,再推荐一篇比较经典的文章:
http://highscalability.com/blog/2016/1/25/design-of-a-modern-cache.html====【结尾】====
关于Java相关的缓存标准,一个是JSR107,一个是Spring Cache。目前Spring Cache基本已经成为了现实中的标准(Spring Cache它也是支持JSR107规范的,可谓非常的友好。(请导入spring-contextr-support包)),所以市面上它的实现产品非常丰富,这些产品间使用起来基本可以无缝切换。整个流程走下来,除了基本配置外,没有引入其他的代码依赖。

所以无论你现在使用的Ehcache还是GuavaCache,基本都可以直接切换到Caffeine上面来。
(在“码大叔”公众号回复数字136即可获取演示源码及牛逼的TinyLfu论文。论文版权归原作者所有,向大神学习致敬)
参考:
https://github.com/ben-manes/caffeine(官方)
https://www.jianshu.com/p/d3bca89b56f7
https://segmentfault.com/a/1190000016091569?utm_source=tag-newest
推荐阅读:
SpringCloud第二代实战系列(一):使用Nacos实现服务注册与发现
感谢各位大佬关注公众号“码大叔”,我们一起交流学习!
微信公众号:码大叔 十年戎“码”,老“叔”开花
原文:https://www.cnblogs.com/madashu/p/12497025.html